Wednesday, 8 November 2017

Java Enumeration

November 08, 2017 Posted by Prakash No comments

Java Enumeration

Before the versions of JDK 5, there lacked one feature that many programmers felt was needed, this is the Enumeration. It is a list of named constants. It is supported by most other programming languages. Though Java offers the similar type of features that provide somewhat similar functionality such as final variable, still programmers are in eager need of the concept of enumeration. In this chapter you will learn about what is enumeration and how it is used within Java programming language to do different tasks.

What is Enumeration?

Enumeration is a list of named constants and these Java enumerations define a class type. By making enumerations into classes, the concept of enumeration is greatly expanded in Java. In simplest form, Java enumerations appear similar to enumerations in other languages, except that the classes play a major role with this concept.
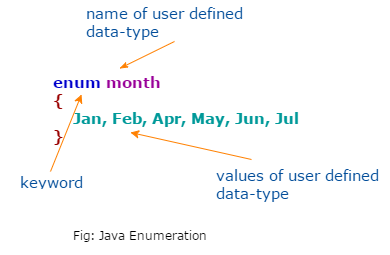
Java Enumeration
Enumeration is used using the keyword enum. For example: here are the lists of various types of programming languages declared using enumeration.
Example:
// an enumeration of varieties of programming languages
enum PLtypes
{
highlevel, machinelevel, assembly, middlelevel
}
Here, the identifiers – highlevel, machinelevel etc are called enumeration constants.
Each of them is implicitly declared as public, static final members of PLtypes enumeration. Hence, in the language of Java, these constants are referred to as self-typed, where self refers to enclosing enumeration. Once the enumeration is defined, programmers can create a variable of its type. However, even though enumerations define a class type, programmers do not initiate an enum using new, instead, they can declare and use enumeration variable like that of primitive data types as used before. For example, this declares langas a variable of enum type PLtypes like this:
PLtypes lang;
lang = PLtypes.assembly;
Two enumeration constants can be compared for checking equality by the use of the == relational operator. For example, this compares the value of lang as the value machinelevel:
if (lang == PLtypes.machinelevel)
{
// . . . . . .
}
It is to be noted that an enumeration value can also be used to control a switch statement. It is of course necessary that all of the case statements must use constants from the same enum as that used by the switch statement. For example, below mentioned switch case statement is a valid statement in Java:
// use enum to control Switch cases
switch (lang)
{
case assembly:
// . . . . . . . .
Case middlelevel:
// . . . . . . . .
//         . . . .
}

Values() and valuesOf() methods

All enumerations automatically contain two predefined methods: values() and valuesOf(). The general forms of these statements are:
public static enum-type[ ] values()
public static enum-types valuesOf (string str)
The values() method returns an array that contains a lists of  the enumeration constants and the valueOf() method returns the enumeration constant whose values corresponds to the string passed in str.

Here is a Program for enumeration

Example:
enum PLtypes {
    highlevel, machinelevel, assembly, middlelevel
}
class enum {
    public static void main(String args[]) {
        PLtypes lang;
        System.out.println(" Here are lists of constants");
        PLtypes alltypes[] = PLtypes.values();
        for (PLtypes a: alltypes)
            System.out.println(a);
        System.out.println();
        lang = PLtypes.valueOf("assembly");
        System.out.println("Value is:" + lang);
    }
}

Java Autoboxing and Annotation

November 08, 2017 Posted by Prakash No comments

Java Autoboxing and Annotation

With the beginning of JDK 5, Java added two more important features; Autoboxing and Auto unboxing.
These features are important and play a very important role in dealing with primitive data types. In this chapter you will learn about how to use these features within a Java source code.

What is boxing in Java?

The automatic adaptation of primitive data types into its corresponding Wrapper type is known as boxing and opposite operation is known as unboxing. Since it is a new feature in Java; so Java programmers do not need to write the conversion code. One advantage of using this feature is that programmers do not required to convert between primitives and Wrappers manually and hence less coding is required.

What are Wrappers in Java?

Wrapper class in java provides the mechanism to convert primitive into object and object into primitive. A wrapper type/class of Java is one of 8 classes provided in the ‘java.lang‘ package used for creating objects for the eight primitive types. Wrapper classes are used to represent primitive values when an Object is required. The lists of all wrapper classes are:
  • short
  • byte
  • integer
  • long
  • float
  • double
  • boolean
  • character

What are Autoboxing and Auto unboxing?

Autoboxing is the process by which a primitive type is automatically encapsulated (boxed) into its equivalent type wrappers whenever an object of type is needed. There is no need to explicitly construct an object. Autoboxing is the process by which the value of a boxed object is automatically extracted (unboxed) from a type wrapper when the program requires its value. Furthermore, autoboxing and auto unboxing greatly streamlines the code of several algorithms, removing the tedium of manually boxing and unboxing values.

Autoboxing / Unboxing in Expressions

Whenever we use object of Wrapper class in an expression, automatic unboxing and boxing is done by JVM.
Here is a simple code snippet showing the autoboxing feature of Java:
Integer iOb;
iOb = 100;  //Autoboxing of int
++iOb;
When programmers perform incrementing of variables / objects of type integers, automatic boxing and unboxing is done by JVM, where the object is first unboxed then incremented and then again reboxed into integer type object.

Advantages of autoboxing and auto unboxing

There are some benefits that this new feature of Java provides us. They are:
  • Less code to write
  • The code looks cleaner and easy readable
  • Programmers do not have to perform Explicit typecasting
  • The best method for conversion is automatically chosen
  • It helps prevent errors, but may lead to unexpected results sometimes.
One disadvantage of autoboxing and auto unboxing is that when programmers mix wrappers with primitives, there becomes a mismatch between ‘equal’ and ‘==’, which becomes difficult to recognize errors.

Autoboxing / Auto unboxing Occurs in Expressions

In general, autoboxing and auto unboxing takes place whenever a conversion into an object or form an object is required. This applies to expressions. Within an expression, a numeric object is automatically unboxed. The outcome of the object is automatically reboxed, when necessary.
Here is a simple program showing the working of autoboxing and auto unboxing:
Example:
public class Main {
public static void main(String args[]) {
   Integer iOb = 60, iOb2; // autobox an int
   int i = iOb; // auto-unbox
   System.out.println(i + " " + iOb);
   iOb2 = iOb+(iOb/3);
  System.out.println(i + " " + iOb2);
 }
}

What is annotation in Java?

With JDK 5, another new facility was provided that enables programmers to embed supplemental information into a source file. This information is called an annotation which does not change the action of a program. Thus annotation leaves the semantics of any program unchanged.
Here is the declaration of annotation named FirstAnno:
Example:
// A simple annotation type
 @interface FirstAnno{
  String str();
 int val();
}
The @ symbol preceding the keyword interface tells the compiler that an annotation type is being declared. There are also two members str() and val(). All annotation solely consists of method declaration and these methods acts much like fields. It is to be noted that annotation cannot include extends clause. However, it is automatic that all annotation programs extend the Annotationinterface. Thus Annotation is the super class of all annotations.

Java Method Overriding

November 08, 2017 Posted by Prakash No comments

Java Method Overriding

Declaring a method in subclass which already exists there in parent class is known as method overriding. When a class is inheriting a method from a super class of its own, then there is a option of overriding the method provided it is not declared as final. The advantage of using overriding is ability to classify a behavior that’s specific to the child class and the child class can implement a parent class method based on its necessity.
There are certain rules that a programmer should follow in order to implement overriding. These are:
  • In java, a method can only be written in child class and not in same class.
  • Argument list should be exactly the same as that of the overridden method of that class.
  • Instance methods can also be overridden if they are inherited by the child class.
  • A constructor cannot be overridden.
  • Final – declared methods cannot be overridden.
  • Any method that is static cannot be used to override.
  • The return type must have to be the same or a subtype of the return type declared in the original overridden method in the parent class.
  • If a method cannot be inherited then it cannot be overridden.
  • A child class within the same package as the instance’s parent class can override any parent class method that is not declared private or final.
  • A child class in a different package can only override the non-final methods declared as public or protected.

Java Program to Demonstrate Method Overriding

Example:
class college {
 public void move() {
  System.out.println("College is open");
 }
}
class univ extends college {
 public void move() {
  System.out.println("University is open too");
 }
}
public class stud {
 public static void main(String args[]) {
  college a = new college();
  college b = new univ();
  a.move();
  b.move();
 }
}

Java Aggregation

November 08, 2017 Posted by Prakash No comments

Java Aggregation

Aggregation can be said as a relation among two classes that is best described as a has-a and whole/part relationship. It is a more specialized version of the association relationship. Now what is association? In Java, when you think of a class having that has member of different type, then there an association can be formed. In a Java class, where there lies an entity reference, it becomes an aggression. Let us take a situation, Student object contains many information such as roll, name, email_add etc. It contains one more object named rank, which contains its own information such as subj_Name, marks, board_name, exam-type etc. as given below.
class Student{
  int roll;
  String name;
  Rank ranking;
}
In this case, Student has an entity reference ranking, so relationship is Student HAS-A ranking Aggregation is also used for code reusability. Aggregation is a form of Association where the relation of Association can be considered the containing class ‘owning’ the contained class. The lifetime of that relationship cannot be defined. ‘Owning’ can be determined as a single-direction Association.

Why Programmers use Aggression in Java?

As told earlier, for code reusability. Let us consider a case where we have used two classes, student class and another id class along with staffs and teacher; in order to maintain Student id, teachers’ id, and staff id, programmers do not need to use the same code again and again. Just use the reference of id class while defining each of these classes. This can be written as:
Student Has-A id (Has-a relationship between student and id)
Staff Has-A id (Has-a relationship between staff and id)
teachers Has-A id (Has-a relationship between teachers and id)

Java Packages

November 08, 2017 Posted by Prakash No comments

Java Packages

It is repeatedly said that one of the main features of the Object Oriented Programming is the ability to reuse the code already written by the programmer. One way of achieving is by extending class and using the interface. It has a limitation. What will you have to do if you have to use a class from another program without physically copying them into the program at the time of development? So another way of achieving the concept of reusability in Java is via the use of Packages. In this chapter you will learn about how packages are used within a Java program.

What are packages?

Packages in Java are groups of similar types of classes, interface and sub packages. It is a way of grouping a variety of classes or interfaces collectively. The grouping is usually done according to functionality. The Java packages act as containers for Java classes.
There is also a term named sub-packages. Package inside the package is called the sub-package. It should be created to categorize the package further.
Here’s are the benefits of organizing classes:
  1. The classes contained in the packages of another program can be easily reused.
  2. Packages also allow programmers to separate design from coding.
  3. In packages, classes can be declared uniquely compared with classes in other packages.
  4. Java Packages provide a way to ‘hide’ classes thus preventing other programs or packages from accessing classes that are meant for internal use only.
  5. Packages provide access protection.
  6. Java package removes naming collision.
For most applications, programmers need to use different sets of classes, one for the internal representation of program’s data and other for the external presentation purposes. You may build your own classes for handling your program data and use existing class libraries for designing class libraries for designing user interface.

Creating Packages

While creating a package, programmers must choose a name for the package and include a package statement along with that name at the top of the source program that contains the classes, interfaces, enumerations, and annotation types that you want to include in the package. There can be only one statement of package in each source code, and it applies to all types in the file.

To compile the Java programs with package programmers have to do use-d option as shown below

javac -d Destination_folder file_name.java
After that, a folder is created with the given package name in a specific location and the compiled class files will be placed in that folder.
The general form of creating package is:
package pack_name;
public class firstClass
{
. . . . . . . . //body of the class.
. . . . . . . .
}
Here, the package name is pack_name and the class firstClass is considered a part of this package. This listing would be saved in as a file called firstClass.java and will be stored in the directory named pack_name. When the file will get compiled, Java will create a .class file and store it in the same directory.

Example of Java Program implementing Package

Example:
package weapons;
interface ammo {
 public void sniper();
 public void rifle();
}

Now we have to implement the above interface in the same package weapons like this

Example:
package weapons;
/* File name : arms.java */
public class arms implements Ammo {
 public void sniper() {
  System.out.println("Magnum Sniper");
 }
 public void rifle() {
  System.out.println("Sub_Machinegun");
 }
 public int noOfBullets() {
  return 0;
 }
 public static void main(String args[]) {
  arms m = new arms();
  m.sniper();
  m.rifle();
 }
}
Now compile the java files as shown below:
$ javac -d . ammo.java 
$ javac -d . arms.java

Accessing Package

There are three ways to access the package from outside the package:
  • import package.*;
  • import package.classname;
  • fully qualified name.
You can use the import statement when there are many references to a particular package. The same approach can be used to access the user defined packages as well. The import statement can be used to search a list of packages for a particular class. The general form of import statement for searching a class is:
import package1 [.package2] [.package3].classname;
Here, package1 is the name of the top-level package. package2 is the name of the package that is inside the 1st package i.e. package1 and so on. Programmers can use any number of packages in the package hierarchy. At the end, the explicitly class name is specified.

Java Interface

November 08, 2017 Posted by Prakash No comments

Java Interface

In the chapter of Inheritance, earlier you have learnt about classes and how they can be inherited by other classes. There, you have also learned about various types of inheritance and pointed out a odd thing that Java does not support multiple Inheritance. That is Java classes cannot have more than one super class, i.e. the technique shown below is not permitted by Java.
Example:
class X extends Y extends Z
{
. . . . . .
}
But Java designers could not overlook the value and importance of multiple inheritance. A large number of real-life applications need the concept of multiple inheritance. Java provides an alternative way of using multiple inheritance know as interfaces to support this concept. Although Java class cannot be a sub class of more than one super class, it can implement more than one interface. Hence this enables programmers to create classes that build upon other classes without the problem created by multiple inheritance.

Declaring Interfaces

The interface keyword is used to declare an interface.
Here is a simple program to declare an interface:
Example:
import java.lang.*;
//multiple import statements can be used here
public interface IntrfaceName
{
//Any number of final, static fields
//Any number of abstract method declarations
}

An interface is similar to class in the following ways

  1. The byte code of an interface appears in a .class file
  2. An Interface is written in a file with .java extension
  3. Interfaces may contain any number of methods
  4. Interfaces can be arranged in packages and the file can be in a directory structure that matches the name of the package

Usage of Interface in Java

  • For achieving full data abstraction
  • Using Interface, you can use the concept of multiple inheritance
  • Interfaces can also be used to achieve loose coupling

Properties of Interfaces in Java

  1. Interfaces are implicitly abstract
  2. Each and every method within an interface is also implicitly abstract
  3. For the above reason, they do not need to be declared abstract
  4. All methods of an interface are implicitly public

Defining Interface

Interface is defined much like a class. The general form of defining an interface is:
Example:
access interface_name{
return-type method1(parameter list);
return-type method2(parameter list);
type final-varName1=value;
//         . . . . . . . .
}
When no access specifier is included, then the default access result along with the interface is only available to other members of the package in which it is declared. When it is declared as public, the interface can be used with any other code. It is to be noted that the methods declared have no bodies. They end with a semi colon after the parameter list. They are essentially abstract methods and there can be no default implementation of any method specified within an interface. Variables can be declared inside the interface declarations.

Implementing Interfaces

Once an Interface has been defined, one or more classes can implement that interface. For implementing interface, programmers need to use the clause ‘implements’ in the class definition and then create the method defined by the interface.
If a class implements more than one interface, the interfaces are separated with a comma. In case, a class is used to implement two interfaces that declares the same method, then the same method will be used by clients of either interface.

Here is a Java Program for Interface

Example:
import java.util.*;
import java.lang.*;
import java.io.*;

interface shapeX {
 public String base = "shape1";
 public void Draw();
}
interface shapeY extends shapeX {
 public String base = "shape2";
 public void Draw2();
}

class shapeG implements shapeY {
 public String base = "shape3";
 public void Draw() {
  System.out.println("Drawing Circle here:" + base);
 }
 @Override
 public void Draw2() {
  System.out.println("Drawing Circle here:" + base);
 }
}

public class Main {
 public static void main(String[] args) {
  shapeG circleshape = new shapeG();
  circleshape.Draw();
  circleshape.Draw();
 }
}